Glad I took the plunge :).
Here's the final product{s}:
I did learn some things along the way. The plastic totes in the top picture did good taking the paint, but when I tried writing on them, two of the three different types of plastic had issues. I managed to easily scratch the chalk paint right off (you'll see in additional pics below).
I also had trouble with the big metal tin. The original chalkboard painted tin that I found on a blog was painted over the entire outer surface, whereas I tried to do a small area which I marked off with masking tape. In the final product the green plastic tote peeled off easily and clean, whereas the tin had some grunge/vintage look to it from the paint seeping under the masking tape. Thankfully I sort of like the unfinished look ;)
So what'd I do with all my newly labeled organization?
{sadly I am out of straws to put in my new straw container!}
{You can see where the paint looked great in the first picture before I wrote on them, but then where it chipped when I used the chalk on it. I'm considering, for smaller projects, using chalkboard contact paper sold on amazon.com for $12 for an 18"x6' roll}
INSPIRATION SPURS MOTIVATION!!!
I thought I had a picture of the before hall closet, but I'm sort of thankful now that I don't because it was just...that...unorganized!! I thought it was, but now I'm realizing it was FAR from organized.
If you put new containers in the closet,
then the rest looks bad...so you have to clean the closet out.
If you clean the closet out,
then you have to reorganize it with the new space {aka less clutter}.
If you reorganize it,
you realize it still looks bleh. You wish you could paint the closet,
...but then you remember you rent and are not allowed to paint.
Then you remember you have half a roll of white contact paper left from another project, so you cover the shelves!
The final, VERY clean, VERY organized, LESS intimidating hall closet:
There are really 3 coolers inside the one big orange one :), and thankful for the saved-in-great-condition Christmas and birthday gift bags!
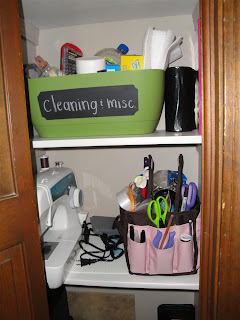
Well would you look at that-the green tote for $2.64 found a home!!
Even more exciting, the clean closet meant a new shelf for my sewing machine and scrapbooking/sewing tote. The tote used to live downstairs, but I realize that I use stuff from it on a daily basis...now it's quick and easy to get to.


Sewing tote home... until Isaac learns to open that door and starts running around with your scissors. Hehehe
ReplyDeleteI'm very impressed with all your decorating and organizing. I was *just* gearing up to hang pictures in my living room when Al lost his job. Guess I'll spare my landlord from having to fix holes in the wall if we have to break our lease. But when we are resettled, I will have to revisit all your awesome ideas. :)
what the camera didn't catch was the child safety lock at the top of the closet door ;) he will only be running with scissors if we forget to relock it!
ReplyDeleteLove all the ways you are using the chalkboard paint! Looks fantastic and is so much fun! Plus, you can always switch out the contents, and just write out a new label, which is the best part!
ReplyDeleteThanks so much for sharing!
xoxo,
Jen